How To Make Peeps Pudding Cups

Author: Allison  //  Category: Desserts, Holiday Desserts

Peeps Pudding Cups

Peeps Pudding Cups

Ingredients for Pudding Cups

1 Oreo for each cup (crushed)

1 Peep for each cup

Starbursts (orange)

Rips Candy (green)

Directions for making Peeps Pudding Cups

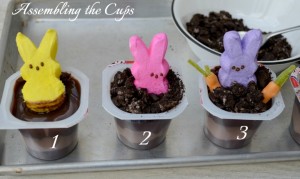
First step is to make the candy carrots.  Cut your orange Starburst in half, make one end pointed and flatten the top part.  Add a green candy Rips to the top part that is flattened and wrap it around the Rips to form a carrot shape. Crush one Oreo for every pudding cup, I put them in a bag and smash them with a soup can.  Open your pudding cups, place a Peep in the middle of the pudding cup. Sprinkle the crushed Oreos around the peep and then add the candy carrots.

How To Make Red Velvet Ice Cream

Author: Allison  //  Category: Desserts, Holiday Desserts


Ingredients:

1/4 cup sugar
2 free range eggs (whole)
2 cups of full cream
1 cup of milk
1t vanilla extract
2t of red food colouring (I used Moirs Crimson red food colouring)
4 red velvet cupcakes
1/2 a cup of cream cheese frosting (1/4 of a cup + 1/4 0f a cup)

Directions:

Beat the eggs and sugar in an electric mixer until pale and fluffy (about 5 minutes).
Add the cream and milk and mix.
Add the vanilla and the food colouring.
Crumble up the cake and either add it all now, or half now and half at the end.
Churn your ice cream through an ice cream machine until it is set.
Remove and decant into a desired container that is suitable for freezing.

How To Make Sweetheart Cherry Pie

Author: Allison  //  Category: Desserts, Holiday Desserts


Ingredients:

Pie dough
Fresh cherries, chopped
Ricotta cheese
Sprinkle of sugar
1 TBSP butter, melted

Directions:

Preheat oven to 375 degrees. Line your baking sheet with parchment paper.
Roll out your pie dough (I like to do this between 2 sheets of plastic wrap). Cut out shapes with cookie cutter.
Sprinkle and stir the sugar with the chopped cherries in a bowl.
Lay out your heart cut outs on the baking sheet. Spoon on some fresh ricotta cheese, then spoon on the cherries. Lay down the top dough, seal to press with a fork.
Brush the top with melted butter.
Bake for about 15 minutes or until mini hearts are golden brown. The baking time will largely depend on the thickness of your pastry dough and your oven. Just keep close watch.
Cool for 5 minutes, then transfer to a wire rack. Dust with powdered sugar if desired.

How To Make Raspberry Cobbler with Dark Chocolate Biscuits

Author: Allison  //  Category: Desserts, Holiday Desserts


Ingredients:

For the filling:

24 oz. frozen raspberries
3½ tbsp. sugar
3 tbsp. cornstarch
1 tsp. freshly squeezed lemon juice
1 tbsp. vanilla extract
For the biscuits:

1 cup all-purpose flour
1/3 cup dark unsweetened cocoa powder
3 tbsp. sugar
Pinch of salt
4 oz. (8 tbsp.) unsalted butter, cold and cut into small pieces
½ cup plus 2 tablespoons buttermilk
2 oz. coarsely chopped chocolate

Directions:

Preheat the oven to 425˚ F. Lightly grease a 2 to 2.5 quart baking dish. In the dish, combine the raspberries, sugar, cornstarch, lemon juice and vanilla. Fold together gently with a spatula until evenly mixed. Transfer to the oven and bake 10 minutes without the topping.

Meanwhile, make the biscuits. In a medium bowl, combine the flour, cocoa, sugar, and salt. Whisk well to blend. Add in the butter pieces and toss with the dry ingredients. Cut the butter into the dry ingredients with a pastry blender or two knives until the mixture is crumbly and the largest butter pieces are the size of small peas. Stir in the buttermilk and mix gently with a fork until a dough begins to form. Knead together gently, just until the dry ingredients are incorporated. Gently fold in the chopped chocolate. Turn the dough out onto a lightly floured surface and pat down into an even layer about 1 inch thick. Use a cookie cutter to cut out heart-shaped biscuits, rerolling dough scraps if needed.

Add the biscuits to the warmed fruit and return the baking dish to the oven. Bake about 15-20 minutes more, until the fruit mixture is bubbling and the biscuits are just set and baked through. (The juices will settle after resting a few minutes, but if the fruit is too juicy, feel free to spoon a bit of the juice off or wick away with paper towels.) Serve warm, with vanilla ice cream or whipped cream if desired.

How To Make Mini Red Velvet Cheesecakes

Author: Allison  //  Category: Desserts, Holiday Desserts


Ingredients:

RED VELVET COOKIE LAYER
1 and 1/2 cups + 1 Tablespoon (198g) all-purpose flour
1/4 cup (32g) unsweetened cocoa powder
1 teaspoon baking soda
1/4 teaspoon salt
1/2 cup (115g) unsalted butter, softened to room temperature.
3/4 cup (150g) light brown sugar (or dark brown)
1/4 cup (50g) granulated sugar
1 egg, at room temperature*
1 Tablespoon (15ml) milk
2 teaspoons vanilla extract
1 Tablespoon red food coloring (liquid or gel)

CHEESECAKE LAYER
12 ounces (336g) full-fat cream cheese, softened to room temperature
2 Tablespoons (30g) yogurt*
1/3 cup (67g) granulated sugar
1 large egg, at room temperature
1 teaspoon vanilla extract
1/2 cup (90g) mini or regular semi-sweet chocolate chips

Directions:

Preheat oven to 350F degrees. Line two 12-count muffin pans with cupcake liners. Set aside.

Make the red velvet cookie layer: toss the flour, cocoa powder, baking soda, and salt together in a large bowl. Set aside.

Using a handheld or stand mixer with a paddle attachment, beat the butter on high speed until creamy, about 1 minute. Scrape down the sides and the bottom of the bowl as needed. Switch the mixer to medium speed and beat in the brown sugar and granulated sugar until combined. Beat in the egg, milk, and vanilla extract, scraping down the sides and bottom of the bowl as needed. Once mixed, add the food coloring and beat until combined. Turn the mixer off and pour the dry ingredients into the wet ingredients. Turn the mixer on low and slowly beat until a very soft dough is formed. Beat in more food coloring if you’d like the dough to be redder. The dough will be sticky.

Press 1 scant Tablespoon of cookie dough into the bottom of each cupcake liner. I say “scant” because otherwise you won’t have enough to make 22-24 mini cheesecakes. Bake each batch for 8 minutes to pre-bake the crust before layering the cheesecake on top.

Make the cheesecake layer: using a handheld or stand mixer with a paddle attachment, beat the cream cheese on medium-high until completely smooth. Add the yogurt and sugar, beating on high until combined. Add the egg and vanilla and beat on medium until combined. Try not to overbeat, which will cause cheesecake cracks. Gently fold in the chocolate chips. Dollop 1 Tablespoon of cheesecake batter on top of the pre-baked cookie, spreading it to make sure it completely covers the cookie.

Return the mini cheesecakes to the oven and continue to bake for about 20 more minutes, making sure the tops of the cheesecake does not get too brown. The cups are done in the oven when the cheesecake topping no longer jiggles when you shake the pan. Cover the cups with aluminum foil if the tops are getting too brown too soon. Allow to cool for 30 minutes on the counter, then in the refrigerator to set for another 1.5 hours.

Cookie cups stay fresh covered at room temperature for 12-24 hours, and then must be refrigerated after that for up to 3 more days.

How To Make Raspberry Lava Cake

Author: Allison  //  Category: Desserts, Holiday Desserts


Ingredients:

3 tbsp spelt, all-purpose, or Bob’s gf flour
1 tbsp plus 1 tsp dutch or unsweetened cocoa powder
1/8 tsp salt
1/4 tsp baking powder
2 tsp sugar of choice or xylitol
pinch stevia or 1 extra tbsp sugar of choice
1/2 tsp pure vanilla extract
3 tbsp milk of choice
2 1/2 tsp vegetable or coconut oil (Although I don’t personally like the cake when applesauce is subbed for the oil, many commenters do think it tastes good this way. Sub at your own risk.)
2 tbsp mashed raspberries or raspberry jam (If using the raspberries, feel free to mix in a little of your favorite sweetener.)
small handful mini chocolate chips, optional

Directions:

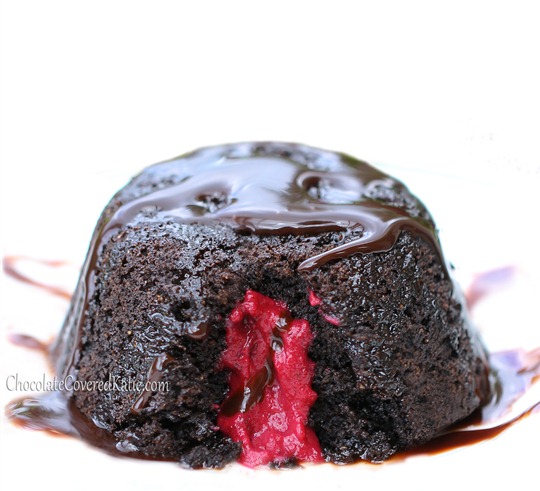
If using the oven, preheat to 350F. Grease a small dish or 1-cup ramekin. In a separate small bowl, combine first 6 ingredients and stir very well. Add the oil, vanilla, and milk and stir to form a batter. Spoon half the batter into the greased dish, spoon the raspberries and optional chocolate chips on top (only in the middle of the batter), then top off with remaining chocolate batter. Either microwave 30-40 seconds or bake 13-14 minutes. If you don’t want to eat it straight out of the dish, be sure to wait for it to cool before trying to remove the cake.

How To Make Glow in the Dark Cupcakes

Author: Allison  //  Category: Desserts, Holiday Desserts


Ingredients:

Ghoulishly Glowing Cupcakes
1 black light
24 prepared and cooled cupcakes

White Glow In The Dark Frosting
7 cups confectioners’ sugar
1 cup vegetable shortening
1 teaspoon clear vanilla extract
5 tablespoons tonic water {diet tonic water works too}
mini chocolate chips morsels

Extras Needed for Green Glowing Frosting
Neon Food Color
0.3 ounce package of either Lime or Orange Gelatin
1 cup boiling water
1 cup chilled tonic water

Directions:

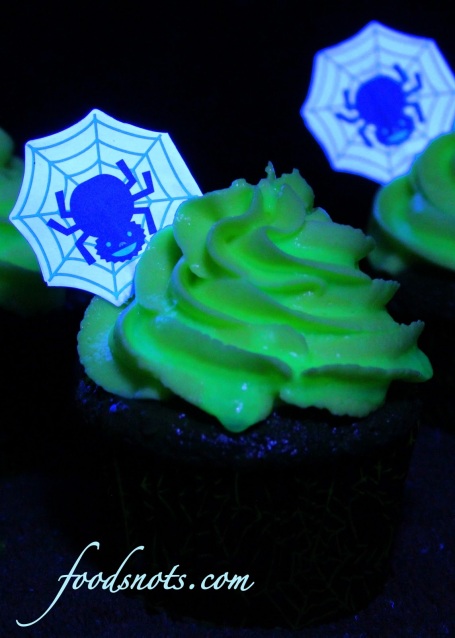
Prepare desired cupcakes and allow to cool. Begin frosting by adding confectioners’ sugar, shortening, vanilla, and 3 tablespoons tonic water into a large bowl. Beat on low speed until no loss sugar is visible. Add remaining two tablespoons as needed to bring frosting to piping consistency. Mix at high speed for about a minute to allow frosting to become light and fluffy. Place half of white frosting into a separate bowl and set aside. Add neon food coloring to frosting until it reaches desired color {orange for orange gelatin, green for lime gelatin}. Pipe colored frosting onto cooled cupcakes and place in the freezer for at least an hour. Meanwhile pipe white frosting on half of the cupcakes using a large round frosting tip. Add two mini chocolate chip morsels for the ghost’s eyes to finish ghost cupcakes. After letting colored cupcakes freeze, prepare the gelatin by adding gelatin mix to 1 cup boiling water. Stir for about 2 minutes then add 1 cup chilled tonic water. Transfer to a container that will let you easily dip frosting into and place into an ice bath to cool. Keep gelatin in ice bath stirring occasionally until gelatin is cool but not yet set {about 5 to 10 minutes}. When gelatin is cool to the touch take cupcakes out of the freezer a couple at a time. Dip into gelatin upside down, submerging the frosting but not the cake {it is ok for the gelatin to drip onto cupcake, just don’t submerge it completely}. Rotate cupcakes dipping and then returning to the freezer for about a minutes to set gelatin, then re-dip. Dip 4 to 6 times for best results. Refrigerate until a couple minutes before serving to keep gelatin set. Then place cupcakes under a black light and watch then glow. {Make enough frosting for about 24 cupcakes}

How To Make Strawberries Filled with Almond Cream

Author: Allison  //  Category: Desserts, Holiday Desserts


Ingredients:

25 jumbo strawberries
3/4 c heavy whipping cream
3/4 c milk
1 small box vanilla instant pudding
1/2 tsp almond extract

Directions:

Wash and dry berries. Slice off stem end. Using a sharp paring knife, slice an “x” deep into berries without cutting all the way down. Beat heavy whipping cream until stiff peaks form. In a separate bowl, combine milk and pudding. Beat for 2 minutes. Add almond extract and whipped cream. Fit a pastry bag with a #10 or #12 round tip (depending on the size of berries). Fill pastry bag with pudding mixture. Pipe pudding into strawberries, spreading petals open with fingers to allow more cream to fit.

A word to the lazy: an alternate way of serving this would be to quarter or slice the strawberries and serve the filling in a small dish. The filling can be spooned over the cut strawberries. Slicing the strawberries and using them as scoops for the filling works well too.

How To Make Red Velvet Cheesecake Brownies

Author: Allison  //  Category: Desserts, Holiday Desserts


Ingredients:

1/2 cup butter
2-oz dark chocolate, coarsely chopped
1 cup sugar
2 large eggs
1 tsp vanilla extract
1 1/2 tsp red food coloring
2/3 cup all purpose flour
1/4 tsp salt
8-oz cream cheese, room temperature
1/3 cup sugar
1 large egg
1/2 tsp vanilla extract

Directions:

Preheat oven to 350F.
Line one brownie pan/cupcake tin with cupcake liners
In small bowl, melt (microwave) butter and chocolate together in 30 second increments. Stir until combined and very smooth.

Set aside to cool for a few minutes.
In a large bowl, whisk together sugar, eggs, vanilla extract and red food coloring. Add chocolate mixture and stir until smooth. Add flour and salt and stir until just combined and no streaks of dry ingredients remain.

Pour batter into lined wells.

To prepare cheesecake mixture, beat cream cheese, sugar, egg and vanilla extract in a medium bowl until smooth. Distribute the cheesecake mixture over batter in the pan. Swirl in with a knife or spatula.

Bake for 20-25 minutes, until brownies and cheesecake are set. A knife inserted into the cheesecake mixture should come out clean and the edges will be lightly browned. Let cool completely in pan.

How To Make Dark Chocolate Peppermint Whipped Cream Tart

Author: Allison  //  Category: Desserts, Holiday Desserts


Ingredients:
For the Tart Dough
1 1/2 cups unbleached all-purpose flour
1/2 cup confectioners’ sugar
1/4 teaspoon kosher salt
9 Tablespoons (4 1/2 ounces) unsalted butter, cold and cut into small cubes
1 extra large egg
For the Filling
1 1/4 cups heavy cream
1/4 cup light corn syrup
12 ounces semisweet chocolate, chopped
1 ounce unsweetened chocolate, chopped
1/2 teaspoon espresso powder
1/4 teaspoon peppermint extract
1/2 cup crushed candy canes
For the Topping
1 2/3 cups cold heavy cream
1/4 cup plus 2 Tablespoons confectioners’ sugar
1 teaspoon peppermint extract
1 Tablespoon crushed candy canes
For the Tart Dough
In the bowl of a food processor, add the flour, sugar, and salt.  Pulse until combined.  Scatter the butter pieces over the flour.   Process in short bursts until the butter is the size of peas.  Add the egg and process in long pulses, about 5-7 seconds until the dough has started to clump.  Place a piece of plastic wrap on the counter and dump the dough onto the surface.  Using the plastic wrap and the back of your hands, gently press the dough into a disk.  Wrap tightly with the plastic wrap and refrigerate for at least 2 hours, preferably overnight.
Preheat the oven to 375º F.  Remove the dough from the refrigerator.  If refrigerated overnight, let it rest at room temperature for 10 minutes.  On a lightly floured work surface, roll the dough out into a 12-inch circle, flouring the dough and surface as necessary to keep the dough from sticking.  Roll up the dough around the rolling pin and gently unroll it over an 10-inch tart pan with a removable bottom.  Fit the dough into the edge of the pan.  Roll the rolling pin over the top of the pan to remove the excess dough.  Place the tart onto a baking sheet and refrigerate for at least 30 minutes or place in the freezer for 15 minutes.

Line the tart pan with aluminum foil and fill with dried beans or pie weights.  Bake for 25 minutes.  Remove the weights and foil and bake for another 10-15 minutes or until golden brown.  Place on a rack to cool completely.

For the Filling
In a medium saucepan over medium heat, bring the cream and corn syrup to a simmer.  Remove from the heat and add the semisweet and unsweetened chocolate; whisk until smooth. Add the espresso powder and peppermint extract and whisk to combine.  Set aside for 30 minutes to cool.  Pour the filling into the crust and sprinkle the top with the crushed candy canes.  Chill until set, about 3 hours.  (Can be made one day ahead and refrigerated.)
For the Topping
In a large chilled bowl, beat the cream, confectioners’ sugar, and extract to stiff peaks using a whisk or hand-held mixer.  Transfer the filling to a piping bag (I didn’t use a tip) or a plastic bag with 3/4-inch cut off the corner.  Pipe 2-inch long ovals of whipped cream side by side around the edge of the tart.  Pipe more ovals inside that ring to form a second ring; pipe more ovals in the center.  Chill for at least 30 minutes and/or up to 3 hours.  When ready to serve, sprinkle the top of the tart with the tablespoon of crushed candy canes.
How To Make Peppermint Bark Cheesecake

Author: Allison  //  Category: Desserts, Holiday Desserts


Pan: One 9″ or 10″ Round Springform Pan Prep: Buttered Starting Oven Temp: 350° Method: bain marie Storage: Cover and Refrigerate
Ingredients
Chocolate Cookie Crust:
2 tablespoons unsalted butter, melted
¼ teaspoon pure peppermint extract
18 cream-filled chocolate sandwich cookies (such as Oreo cookies,) crushed to make about 1½ cups crumbs
White Chocolate Filling:
8 ounces white chocolate, chopped into small pieces
4 (8 ounce) packages cream cheese, room temperature
1¼ cups granulated sugar
1 cup sour cream
1 tablespoon pure vanilla extract
2 tablespoons all-purpose flour
4 large eggs, room temperature
8 ounces Peppermint Bark, chopped into small pieces about ¼ inch (about 2 cups)
White Chocolate Mousse:
1 cup whipping (heavy) cream, divided
4 ounces white chocolate, chopped into small pieces
½ teaspoon pure peppermint extract
2 tablespoons confectioners’ (powdered) sugar
Garnish:
6 ounces Peppermint Bark, chopped into small pieces about ¼ inch (about 1⅓ cups)
Whipped Cream Topping (optional):
1 cup whipping (heavy) cream
¼ cup confectioners’ (powdered) sugar
1 or 2 ½-ounce peppermint Candy Canes, crushed

Instructions
Preheat oven to 350 degrees F. Prepare one 9 or 10 inch round cheesecake pan or springform pan with 3 inch sides; use a pastry brush to lightly butter the pan with about 1 tablespoon of melted butter. Tip: use either a 9 or 10 inch pan. A 9 inch will make a higher cheesecake.
Chocolate Cookie Crust:
In a small bowl combine the melted butter and peppermint extract. Set aside.
Crush or grind the whole cookies, including the cream filling, to make crumbs. Tip: place whole cookies in a food processor or small grinder. Add melted butter mixture; stir until thoroughly mixed and mixture is crumbly.
Bake: Pour the cookie crumb mixture into the springform pan. Using the back of a large spoon or the flat bottom of a measuring cup or drinking glass, press the crumb mixture firmly and evenly across the bottom of the pan. Place the pan on a baking sheet; bake 10 minutes. Remove from oven and place on a wire cooling rack to cool.
When cooled, wrap bottom and sides of pan in a double layer of heavy duty aluminum foil to prepare for the bain marie water bath. The foil is to prevent any water from seeping into the cheesecake through the pan seams.
Reduce oven to 325 degrees F.
White Chocolate Filling:
In top of a double boiler over hot water, melt the white chocolate. Set aside to cool slightly. Tip: Create a double boiler by filling a saucepan with 2 inches of water and bringing it to a simmer. Turn the heat off and place a stainless steel, ceramic, or glass bowl on top of the hot water, the upper pan should not touch the water.
In a large bowl, add the cream cheese and sugar; mix on medium low speed with an electric mixer until smooth and creamy, 1 to 2 minutes. Scrape the mixture off the paddle and scrape down the sides and bottom of the bowl with a rubber spatula so the mixture blends evenly and there are no lumps.
Add the sour cream, vanilla, and flour; beat until mixed. Add the melted chocolate; continue beating on medium low speed until thoroughly combined, about 1 minute.
Add the eggs 2 at a time, beating until thoroughly combined, about 1 minute, scraping the bowl between additions. Tip: crack the eggs into a small bowl and whisk with a fork to thoroughly break up the egg before adding to the cheese mixture. Tip: Do not overbeat the cheesecake batter. Blend the ingredients quickly to add as few air bubbles as possible. The ingredients must be well blended, but excessive beating creates too many air pockets which can cause the cheesecake to puff up too much during baking, and then crack during the cooling process.
Using a large rubber spatula, gently fold the peppermint bark pieces into the batter.
Let the filling rest about 5 minutes to allow air bubbles to rise to the surface.
Meanwhile, bring a large pot of water to boil to use for the bain marie water bath.
Pour the cheesecake filling into the cookie crust.
Bake: Set the foil wrapped springform pan in a larger pan or roasting pan and transfer to the oven. Carefully pour boiling water into the roasting pan to come halfway up the sides of the springform pan, and close the oven door. Bake 70 to 90 minutes. Tip: The Cheesecake is done when the edges are set but the center 2 to 3 inches are still a pool of liquid batter. The cake should look as though it has puffed a little and just barely beginning to brown. The center will still be soft and jiggly when the pan is lightly jarred or tapped with a spoon.
Remove from oven, place springform pan on a wire cooling rack to cool. Immediately run a thin knife around the edge of the pan, gently pressing into the side of the pan to avoid gouging the cake. This allows the cake to contract away from the sides of the pan as it cools, helping to prevent cracks.
When cheesecake is completely cooled, cover the pan and refrigerate for 12 to 24 hours before serving. Try to avoid having the covering touch the top of the cheesecake as this may mar the surface.
White Chocolate Mousse:
In top of a double boiler over hot water or low heat, combine ½ cup whipping cream and white chocolate; heat and stir until chocolate is melted and mixture is smooth. Remove from heat and let stand until mixture is cool and beginning to thicken, stirring occasionally to keep the mixture smooth. Stir in peppermint extract. Set aside.
In a medium mixing bowl, using an electric mixer, beat remaining ½ cup whipping cream until soft mounds form; gradually add the confectioners’ sugar; continue beating until thick and stiff. Slowly drizzle in the cooled chocolate mixture, continuing to beat until well combined. Tip: the cream will whip easier if the mixing bowl and beaters are first chilled; place in the refrigerator to chill until ready to whip the cream.
Spread the White Chocolate Mousse evenly over the top of the chilled cheesecake. Refrigerate the cake until the mousse is set, at least one hour.
Garnish:
Sprinkle peppermint bark pieces evenly over the top of the White Chocolate Mousse.
Serve with Whipped Cream Topping sprinkled with crushed peppermint candy, if desired. Refrigerate leftovers.
Whipped Cream Topping (optional):
In a medium mixing bowl, using an electric mixer, beat 1 cup whipping cream until soft mounds form; gradually add the confectioners’ sugar; continue beating until thick and stiff.
Spoon whipped cream on top of cake or individual servings, or use a pastry bag and decorating tip to pipe the whipped cream into decorative rosettes. Sprinkle each piece with about ½ teaspoon crushed candy canes.

How To Make Red Velvet Peppermint Thumbprints

Author: Allison  //  Category: Desserts, Holiday Desserts


Ingredients

1 box red velvet cake mix
8 oz (1 block) cream cheese, softened
1/2 cup (1 stick) butter, softened
1 large egg
1 1/2 teaspoons vanilla
1 cup powdered sugar
1 bag white chocolate peppermint Hershey Kisses, unwrapped

Directions:

In the bowl of a mixer, beat butter and cream cheese on medium speed until well combined. Add egg and vanilla and beat. Add cake mix and beat until combined. Chill dough for 2 hours. Preheat oven to 350. Scoop cookie dough with a 1 inch cookie scoop and roll in powdered sugar. Place on ungreased cookie sheet, 2 inches apart. Bake for 11 minutes. Remove from oven and press a Hershey Kiss in the center of each cookie. Remove cookies to wire rack to finish cooling.

How To Make Chocolate Fudge Cookies with Candy Cane Buttercream

Author: Allison  //  Category: Desserts, Holiday Desserts


Ingredients:

CHOCOLATE COOKIES
1 cup + 1 Tablespoon (133g) all-purpose flour
1/4 cup (32g) unsweetened cocoa powder
1 teaspoon baking powder
1/4 teaspoon salt
8 ounces semi-sweet chocolate, chopped (I use 1 package Baker’s Semi Sweet chocolate)
2 large eggs
1 teaspoon vanilla extract
5 Tablespoons (75g) unsalted butter, softened to room temperature
3/4 cup (150g) light brown sugar
1/4 cup (50g) granulated sugar
1 cup (180g) mini chocolate chips
CANDY CANE BUTTERCREAM FROSTING
3/4 cup (170g) unsalted butter, softened to room temperature
2.5 – 3 cups (300-360g) confectioners sugar, sifted
2 teaspoons vanilla extract
1-2 Tablespoons (15-30ml) heavy cream or milk
1/2 cup candy cane dust, sifted (about 8-10 candy canes pulverized in a food processor)
crushed candy canes for rolling, optional
Directions:

Begin with the cookies. Sift together flour, cocoa powder, baking powder and salt in a medium bowl. Set aside.

Melt the chocolate in the microwave for about 1 minute. Stir. Continue to melt in 30 second increments until fully melted and smooth. Set aside. In a small bowl, whisk the eggs and vanilla. Set aside. With an electric or stand mixer with paddle attachment, beat the butter until smooth and creamy – about 1 minute. Beat in the sugars, scraping down the sides every 10 seconds or so. The mixture will be granular.

Mix in the beaten egg/vanilla until incorporated. Add the chocolate in a steady stream and beat until combined. Add the dry ingredients on slow speed. Fold in the mini chocolate chips. Do not overmix at any point in this process.

Chill dough for at least 30 minutes. Preheat oven to 350 degrees F. Scoop about 1 Tablespoon of dough and roll into a slightly flattened ball. Bake for about 10 minutes, or until the cookies have just begun to set with the centers still appearing very soft. They will firm up as they cool.

As the cookies cool, make the buttercream. Beat the butter for 1 minute with the paddle attachment on medium speed. Add 2.5 cups of sifted powdered sugar and slowly mix on low speed. Increase mixer speed to medium and add vanilla extract, salt, and 1 Tablespoon of cream/milk. Beat for about 1 minute. Manually stir in candy cane dust. If your buttercream needs to be thicker, add more powdered sugar. If your frosting needs to be thinned out, add remaining milk/cream. If frosting is too sweet, add a pinch of salt.

Frost the bottom end of a cooled cookie and top with another to make a sandwich. Store in an airtight container in the refrigerator for up to 5 days.

How To Make Peppermint Chocolate Cake

Author: Allison  //  Category: Desserts, Holiday Desserts


Ingredients:
2 1/2 cup(s) all-purpose flour
1 1/4 cup(s) unsweetened cocoa
2 1/4 cup(s) granulated sugar
3/4 cup(s) packed brown sugar
2 1/4 teaspoon(s) baking soda
3/4 teaspoon(s) baking powder
3/4 teaspoon(s) kosher salt
1 1/2 cup(s) whole milk
3/4 cup(s) canola oil
3 large eggs
1 1/2 teaspoon(s) peppermint extract
1 1/4 cup(s) boiling water
20 mini candy canes
3 package(s) (8 ounces each) cream cheese, at room temperature
3/4 cup(s) (1 1/2 sticks) unsalted butter, at room temperature
1 box(es) (1-pound) box confectioners’ sugar
Peppermint Meringues, for decorating (optional)

Directions:
Heat oven to 350 degrees F. Coat three 8- by 2-inch round cake pans with cooking spray. Line the bottoms with parchment paper; spray the paper.
In a large bowl, whisk together the flour, cocoa, granulated and brown sugars, baking soda and powder, and salt. In a bowl, whisk together the milk, oil, eggs, and peppermint extract. Mix the milk mixture into the flour mixture until fully incorporated. Mix in the boiling water (the batter will be thin).
Divide the batter among the prepared pans and bake until a wooden pick inserted in the center comes out clean, 35 to 40 minutes. Let cool for 10 minutes in the pans before transferring to a wire rack to cool completely.
Meanwhile, crush the candy canes and make the icing. Using an electric mixer, beat the cream cheese and butter in a large bowl until smooth. Beat in the confectioners’ sugar until light and fluffy, about 3 minutes.
Place one cake layer on a platter. Spread 1 1/4 cups icing over the top. Top with another layer and 1 1/4 cups icing. Top with the last cake layer. Frost sides and top with the remaining icing. Gently pat the crushed candy canes all over the sides of the cake. Top with meringues (if using)

How To Make Peppermint Whipped Cream

Author: Allison  //  Category: Desserts, Holiday Desserts


Ingredients:
6 red and white peppermint candy canes or 24 red and white mini peppermint candy canes
2 cups of whipping cream

Directions:
Unwrap your candy canes and place them in a blender or food processor. I like to break them into pieces as I add them to the blender.
Process until the candy canes util they are a fairly fine powder.
In another bowl, whip cream until firm. No need to add sugar. The sweetness will come from the candy canes.
Fold in the candy cane powder in the cream. Use immediately to top you cocoa if you like little pieces of crunchy candy cane in it (This is the way I like it). Or place in the refrigerator for 2 hours and allow the candy canes to completely dissolve.

How To Make Santa Hat Brownies

Author: Allison  //  Category: Desserts, Holiday Desserts


Ingredients:
1 pan of your favorite brownies, cooled and cut into desired size and shape (I used a round cutter)
12-16 small strawberries, cleaned and hulled
vanilla-mascarpone buttercream (recipe below)

Vanilla-Mascarpone Buttercream
Ingredients:
1/2 cup (1 stick) unsalted butter, room temperature
8 ounces mascarpone cheese, room temperature
2-1/2 to 3 cups powdered sugar
2 teaspoons vanilla extract
pinch of salt

Method:
Using a stand mixer with a paddle attachment, beat butter and mascarpone cheese until light and creamy, about 2 minutes. Add vanilla extract and salt. Add 2-1/2 cups of sugar, half a cup at a time and continue beating until smooth. Add more sugar, if needed to reach desired consistency and sweetness.

To assemble, pipe a ring of vanilla buttercream on top of each brownie. Cut off the base of a strawberry so it is flat and place it upside down on each brownie, pushing slightly to secure in place. Top the tip of the strawberry with a dot of buttercream to finish the santa hat.